A mulch pile against the trunk can obscure the base and keep the contact area persistently covered. Tree care should begin with understanding the trunk flare, soil level and surrounding conditions. Share photos of the base from a safe position and ask for an appropriate correction rather than adding more material to hide the area.
Correct trunk-side mulch without damaging the root flare
Mulch is most useful over the soil surrounding a tree, not piled against the bark. A mound that hides the root flare can hold persistent moisture at the trunk and make it harder to notice buried roots or other problems. Look for an obvious cone against the stem, saturated material stuck to bark, or soil and mulch built up over the original grade. Photograph the base before moving anything.
Work carefully near the stem. Pull loose mulch away from direct trunk contact and spread it across a broader ring where practical, but do not gouge bark or uncover major roots with a shovel. If the flare is buried under imported soil or substantial fill, further investigation may be needed; removing material aggressively can harm fine roots. Avoid treating mushrooms or insects with chemicals before identifying the cause.
Specify the intended finish in a landscape-maintenance request: visible trunk flare where safely achievable, no mulch pressed against bark, no new buried irrigation emitters and an even surface that does not direct water into the trunk. Schedule follow-up after landscape crews refresh beds, because a corrected ring can become a mound again if the maintenance instructions are not passed along.
Inspect the mulch profile from several sides and photograph whether it slopes up against the bark like a cone. Organic mulch can moderate soil moisture, but a deep pile in constant contact with the trunk hides the root flare and can trap moisture against tissue not meant to stay buried. Do not assume that the proper solution is to excavate aggressively with a shovel near major roots. Start by identifying how high the mulch and soil sit relative to the visible trunk widening.
Ask the tree-care professional whether the problem is only excess mulch or whether buried grade, circling roots or drainage changes also need assessment. Specify an even, appropriate mulch zone kept back from the trunk, with no claim that a particular depth fixes every site. Record whether removed material will be reused elsewhere or hauled away. If the flare remains buried after loose mulch is pulled back, seek guidance before disturbing compacted soil and roots. Compare follow-up photographs to avoid recreating the same mound next season.
Identify what the trunk flare should look like
A tree's trunk normally widens where major roots begin to spread into the soil. When mulch is piled high against that area, it can conceal the flare and make the lower trunk appear to rise straight out of a mound. Photograph the tree from several directions and note the approximate height and width of the mulch pile. The point is to document the condition, not to dig aggressively for hidden roots.
A raised mound may contain mulch, added soil or a mixture of both. Those materials behave differently, and the depth of the original root flare cannot always be determined visually. If the tree has been buried for years, ask an arborist about a careful assessment before moving substantial material. Sudden digging with a shovel can injure roots or bark, especially around mature trees with complicated bases.

Understand why mulch against bark can be a concern
Mulch can conserve moisture and moderate surface temperature when applied appropriately, but a thick mass pressed against bark changes conditions around the lower trunk. Persistent moisture, reduced visibility and potential damage from rodents or insects may become harder to notice. The problem is not that all mulch is harmful; it is the placement and depth in relation to the living trunk and roots.
Avoid diagnosing a hidden disease solely because the mulch appears dark or damp. The actual condition should be evaluated, including whether soil covers the flare and whether the lower bark shows injury. A simple adjustment may be appropriate for some sites, while older burial or decay concerns may require professional examination. The objective is an appropriate planting-bed configuration, not making a dramatic excavation for appearance.
Find the root flare before adding another load of mulch
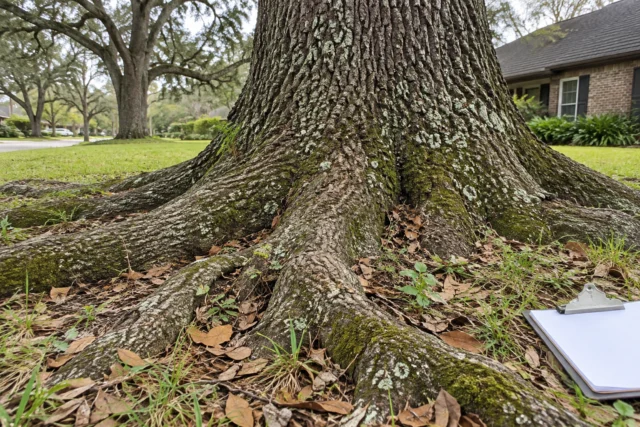
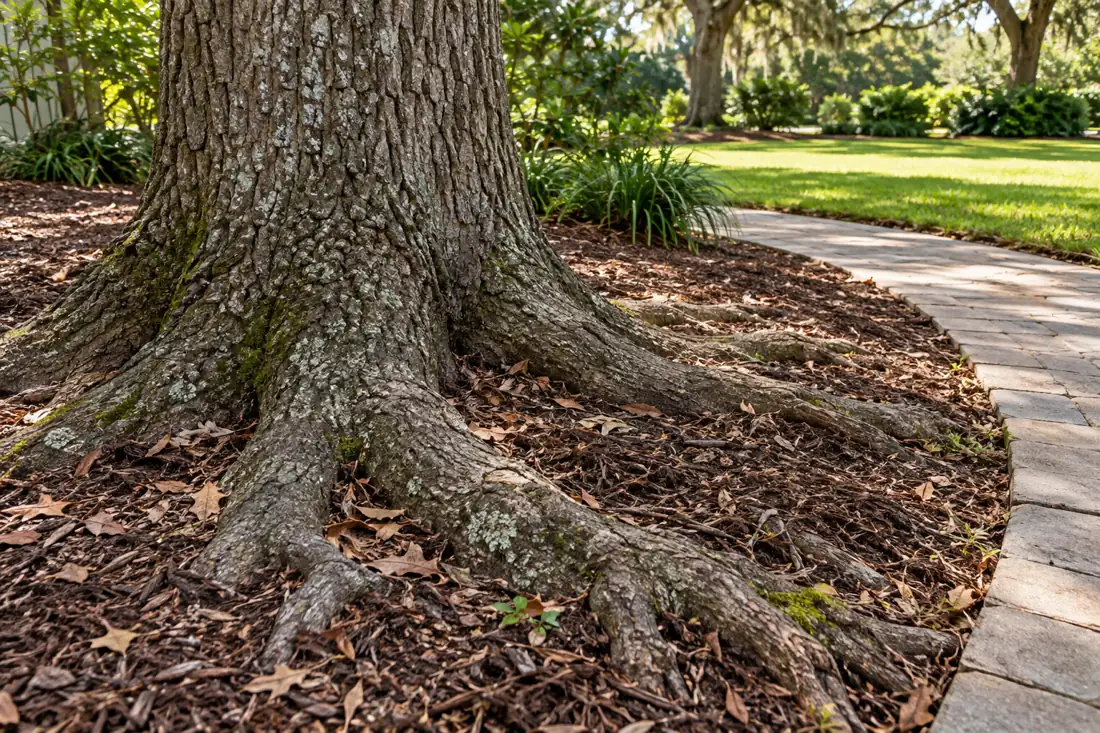
A mound of mulch pressed against the trunk can keep the bark wet and hide changes in the root flare. Look for where the trunk naturally widens toward the main roots rather than treating a decorative cone as the target shape. Pull loose material back carefully by hand so the flare is visible, avoiding sharp tools against bark. If the original planting depth is uncertain, do not excavate deep around large roots without a suitable assessment.
Mulch depth and placement depend on soil, drainage and how the bed is used. A broad, moderate layer over suitable soil is a different practice from piling material around the stem. Check whether repeated annual top-ups have raised the grade over time. Adding mulch to cover exposed roots or standing water can conceal the reason for a landscape problem rather than improve the tree.

Check the root flare before changing a mulch ring
Mulch can protect soil moisture and reduce mower damage, but piled material held against bark can keep the lower trunk wet and hide problems. Look for the natural transition where trunk tissue broadens toward the roots. If this transition cannot be found, consider whether excessive mulch, added soil or previous landscaping work has obscured it rather than assuming the tree simply lacks one.
Pull loose mulch back from direct trunk contact by hand where safe, keeping the area tidy and avoiding cuts to exposed roots. Maintain a modest, broadly distributed surface layer appropriate to the site instead of building a cone against the bark. Do not dig aggressively into the root crown or cut large roots to make a decorative circle; unusual buried bark, soft wood or fungal growth warrants assessment.
Photograph the trunk base before and after the correction from the same safe viewpoint so the change is clear. Consider water runoff, irrigation emitters and landscape edging as well as mulch depth. The accompanying root-flare image illustrates an observation point, not a diagnosis of any particular property's tree.
Distinguish mulch from added soil and old landscape fabric
Fresh wood mulch, decomposed organic material and soil can look similar after seasons of rain and maintenance. Photograph any distinct layers that are visible without disturbing roots and describe when landscape work occurred if known. Old fabric, edging and compacted fill may also be present. These observations help the assessor understand whether material was repeatedly added on top of previous layers.
Do not assume every buried flare can be corrected safely in one homeowner session. Removing soil around roots can expose or injure tissues, while leaving a deeply buried flare may perpetuate an unfavorable condition. Where the root collar is uncertain, ask about appropriate low-impact inspection and corrective options. The professional can consider species, tree age and the actual depth before recommending a change.
Show the Root Flare Instead of Piling Mulch Against Bark
Mulch can help manage exposed soil, but piling it against the trunk hides the root flare and keeps bark in a different moisture environment. When evaluating a tree bed, first document the existing depth, where the bark meets the mulch and whether roots are visible above the soil.
Do not scrape the trunk or excavate deep around roots in an attempt to create a perfect-looking flare. The correction may involve carefully moving loose surface material outward and determining whether soil itself is covering the root collar. That distinction can matter when a tree has years of accumulated fill.
A realistic educational photo illustrates what to look for; it is not a diagnosis of decay. If softness, cavities, insect activity or abrupt leaf changes are present, add those observations to a professional tree-health inquiry. Keep routine landscape changes separate from claims that one mulch condition caused every symptom.

Correct the planting detail before treating mulch as a tree disease
A mound of mulch pressed against the lower trunk can conceal the root flare, hold moisture against bark and make it difficult to see existing problems. Begin by identifying the true trunk base and whether the soil surface is also piled too high; mulch and soil are different materials with different correction considerations. Use a clear ground-level photograph of the entire planting bed and the lower trunk without scraping the bark or pulling roots. A tidy-looking cone is not proof of good tree care, and a dark bark color alone does not establish rot.
Ask whether the mulch is being added each season without old material being considered. Repeated top-dressing can create a deeper mound even when each individual addition looks modest. A qualified tree-care or landscape professional can advise on appropriate mulch depth, keeping material away from direct trunk contact and preserving the root flare without unnecessary excavation.
Do not use sharp tools against the trunk or cut visible roots merely to improve the photograph. Where bark damage, fungal growth or unusual decline appears, those concerns may justify a separate inspection rather than only moving mulch.
Consider irrigation and lawn equipment at the same time. A planting bed that keeps mowers and string trimmers away from the trunk may offer a benefit, but neither direct sprinkler spray nor frequent piling of wet mulch against bark is desirable. Ask who manages irrigation, seasonal bed maintenance and fertilizer applications before promising a fix.
If the underlying soil is buried around the base, simply spreading the top mulch may not address the complete condition. A written scope should describe what material is adjusted and what observations remain unresolved.
Take a final photograph showing the visible base and corrected bed outline, then add the detail to routine landscape instructions so the cone is not rebuilt the next month. Keep claims measured: changing mulch placement can remove one avoidable stress but does not guarantee recovery from established decline or root defects.
The maintenance objective is a stable, inspectable trunk base and soil surface, not a decorative mound of a particular height. Where the tree has substantial health symptoms, request assessment of the whole tree and its site conditions.

Correct excessive mulch without burying or injuring the root flare
A tall mound of mulch pressed against bark is not a sign that a tree is receiving extra care. It can keep the trunk base persistently damp, conceal root flare problems, and make inspection harder. First identify where the trunk widens into its roots, rather than assuming the visible mulch surface is the natural soil level.
Brush away loose mulch carefully and avoid striking bark or pulling at established roots. If years of fill or soil cover have obscured the base, deeper corrective excavation may need a qualified professional rather than a homeowner digging aggressively around the trunk.
Good mulch management is about a broad, suitable surface layer, not a volcano. Keep material away from direct bark contact and avoid changing drainage so water pools against the trunk. When an existing landscape bed contains irrigation lines, weed barriers, stone edging, or compacted soil, correct those conditions as part of an overall plan rather than piling fresh mulch on top.
Document the root flare, any visible defects, surrounding grade, and how water moves during rain. A tree with cavities, decline, or unusual root growth still requires appropriate assessment; correcting a mulch ring alone cannot establish stability. Explain the difference between cosmetic landscape cleanup and treatment of a structural concern.
Mulch correction: observe the root collar before disturbing it
The visible mound of mulch is a maintenance issue, but it does not prove what is happening beneath the surface. Photograph how high the material sits against the bark and whether irrigation repeatedly wets the same area. The finish should expose the root flare appropriately without scraping, cutting or aggressively digging against live tissues.
Set a simple maintenance specification for landscapers so the problem does not return at the next visit. Ask that mulch be kept off the trunk and that any suspicious softened bark, unusual growth or instability be reported for professional review. Do not call exposed decay or root defects based on a photo alone.
Connect trunk moisture, drainage and maintenance history
After heavy rain, note where water pools, whether irrigation sprays directly onto the trunk and where mulch remains saturated. Mushrooms in a bed may reflect decomposing organic material, but signs of decay on the living trunk deserve separate examination. Record any wounds made by string trimmers or lawn equipment. A healthy landscape-maintenance plan keeps the trunk visible for future inspections and avoids hitting shallow roots with machinery.
Share simple maintenance instructions with whoever renews the bed: keep mulch off bark, avoid dumping soil at the flare, and photograph the base before another topping-up. If the site has unusual grade or drainage changes, ask a qualified assessor to review root health before modifying it. One attractive photo of a mulched tree does not establish correct planting depth or exclude hidden decay.
Document the root flare before changing the mulch bed
Photograph the trunk base from several angles, including the slope of the mulch and any visible root flare. Clarify whether the mound consists of mulch, added soil or both; digging through it without knowing the buried root and trunk condition can cause new damage. Ask for an assessment if the original grade is uncertain or the trunk has been buried for a long period.
The intended result is a suitable mulch zone without persistent contact against bark, not a universal depth imposed on every site. Note irrigation and drainage conditions when planning correction.

Create a maintainable mulch boundary
Where appropriate, move loose mulch away from direct trunk contact and maintain a visible opening around the base. The surrounding layer can remain useful for protecting roots and reducing mower traffic if it is kept reasonably even. Avoid leaving a steep volcano that sheds water or invites repeated refill. Mark the boundary in a way the landscape crew can understand on every visit.
A neatly edged circle is not the primary goal. The bed should provide practical separation from string trimmers, protect the root area and allow rain and irrigation to reach soil suitably. Do not cut large surface roots or bury them with more material to force a perfect ring. If the bed abuts a walkway or drain, consider how the material may migrate during heavy rain.
Check for bark injury and root-collar symptoms
After the mulch boundary is clarified, look for damaged bark, oozing, unusual softness, fungal structures or changes around the lower trunk from a safe position. Photograph observations rather than peeling off bark or probing with a tool. A discolored area may have several possible causes, so avoid labeling it a specific disease without a qualified examination. Some trees show normal bark differences with age.
If the tree has a new lean, significant cracking or sudden canopy decline, include those concerns in the assessment request. A buried flare can coexist with other problems but should not automatically be blamed for every symptom. The arborist may need to assess root health, trunk structure and site moisture. Keep people away from potential failure zones where an actual hazard is suspected.

Consider irrigation and drainage conditions
Irrigation heads that repeatedly wet the lower trunk can combine with thick organic material to keep the area damp. Observe where water lands and whether the ground stays saturated between cycles. A tree also needs suitable soil moisture, so switching irrigation off entirely without evaluating the site is not a general solution. The watering plan should consider species, weather and drainage.
Where a bed collects water against a foundation or path, a drainage professional may need to review grading separately. Removing mulch is not guaranteed to correct a low spot or underground pipe issue. Give the tree assessor accurate information about runoff, soil fill and irrigation changes, then address the actual contributing conditions. Do not trench through major roots simply to move surface water away.
Protect the roots during landscaping changes
A common mistake is replacing a mulch volcano with deep cultivation or a sharp spade cut around the tree. Such work can sever fine and structural roots, particularly in established landscapes where roots spread close to the surface. Explain to maintenance workers where the root protection area lies and keep heavy tools or equipment from scraping the trunk. The aim is low-disturbance correction.
If shrubs, edging or lighting occupy the mound, plan their removal or relocation before digging. Do not drive stakes through suspected major roots or install a new raised retaining ring without considering soil depth. A tree professional can advise when careful root-collar work is appropriate and what precautions apply. Preserve photographs of the starting condition so later changes can be evaluated accurately.

Adjust the maintenance routine, not just one visit
Mulch accumulation often comes from adding a fresh decorative layer each season without checking the previous depth. Ask the landscape crew to inspect the existing material before applying more. Provide a simple reference photograph that shows the desired visible trunk flare and mulch boundary. This helps when different workers maintain the same property over time.
Include mower and string-trimmer protection in that routine. A correctly managed bed can reduce mechanical bark injury, but it should not turn into a large pile against the trunk. After storms or heavy rain, check whether washed material has collected at the base or blocked drainage. Maintenance practices are most effective when they prevent repeated burial, not when they require another major correction each year.
Know when a detailed assessment is warranted
A small recent mound on an otherwise stable tree may call for a different response than a mature tree with years of soil burial, decay indicators or a changed root plate. Ask the arborist what can be assessed visually and whether further inspection would influence the recommendation. Specialized excavation techniques may be considered in some cases, but they need proper justification and care around roots.
Do not treat visible green leaves as proof that the buried trunk has no problem, and do not assume the tree must be removed because mulch has accumulated. Condition, species, site exposure and history matter. If there are structural warning signs over an occupied area, restrict access appropriately while seeking qualified help. A measured response avoids turning a maintenance problem into unnecessary damage.

Set a clear finish and follow-up record
A useful scope describes whether the job involves simply redistributing loose mulch, evaluating the root collar, removing added soil or coordinating more extensive landscape changes. These are different levels of work. Identify who will haul excess material, protect nearby roots and maintain the bed afterward. The tree professional should state any limitations and follow-up observations if the condition is uncertain.
Take photographs from repeatable viewpoints after the work and retain the recommendation. A corrected mulch profile does not erase past injury or guarantee future tree health. Watch for significant new changes and involve the appropriate professional when needed. Tree Huggers can discuss tree-care concerns and practical work scope; submitting an online estimate request is not a diagnosis, booked visit or promise of a particular outcome.
Questions about this project
Should mulch be used to hide a damaged trunk base?
No. Explain the injury or concern and ask for an assessment. Added material can obscure the area rather than resolve the problem. Care recommendations should address the actual condition and site.
Why does the tree-care discussion include mowing?
Repeated contact from mowers or trimmers can injure the base. Share how the area is maintained so the professional can consider protection and site care along with any pruning or treatment needs.
Is a free work estimate the same as a written risk assessment?
Not necessarily. Explain whether you need pricing, condition advice, a documented assessment or a combination. Ask what the visit includes, who provides it and what limitations apply to any findings or recommendations.
What history should I share?
Share known storm damage, prior failures, construction, root disturbance, flooding, pruning and recent changes. Include the timing and nearby property use. Useful history supports the evaluation without replacing inspection of the current tree and site.
Is leaving the trunk untouched enough to protect a tree?
No. Roots, soil conditions and nearby work can matter even when the trunk is not cut. Identify retained trees before planning access, excavation and storage, and ask what site-specific protection is appropriate.
Can pruning undo construction-related root damage?
Do not assume it can. Share the work history and ask for an assessment of the current tree and site. Pruning, monitoring or other recommendations should address an identified need rather than substitute for protection planning.
Can tree equipment use any driveway?
No general assumption should be made. Pavement condition, edges, support, buried infrastructure and the proposed equipment all matter. Ask the contractor to assess the intended setup and route for the particular property.
Do mats guarantee there will be no ground damage?
Ground protection is one part of a site-specific plan. It does not remove every load, soil or access limitation. Discuss the proposed measures and any restoration responsibilities in the written scope.
What should I compare besides the price?
Compare tree identification, work objectives, access assumptions, hauling, stump treatment, site finish and exclusions. Ask whether permits or other coordination are part of the scope and who can approve changes if conditions differ.
Does an online request book the crew?
No. A request starts the estimate conversation. The company still needs to discuss scope, availability and any site assessment. For a dangerous or urgent condition, call 504-458-8336 rather than relying on a form response.
What should I tell Tree Huggers about mulch piled against a tree trunk?
Explain the property address, the work you want and the specific concerns: covered trunk base, soil level, root flare. Send safe photos of the tree, surroundings and access route. The contractor can then discuss the assessment and scope needed for this situation.
How do I request an estimate for this work?
Call 504-458-8336, text photos or use the estimate form on this page. Include the address, desired outcome and any timing constraints. The company will need to review scope and availability; an online request does not confirm a price, appointment or emergency dispatch.
Get a scope for your property
A deep mulch mound against a trunk hides the root flare and may keep bark at the base in persistent contact with damp organic material. In your request, include a wide photograph of the tree, a side view showing the mound's height and a brief account of when the mulch was installed.
Note whether nearby irrigation, raised soil, edging or fresh landscaping changes have also altered the grade. Do not scrape or cut bark to expose the base for a photograph; documenting the existing condition is enough to begin the conversation.
The scope should identify whether mulch can be redistributed safely, whether buried soil or roots need further evaluation, and who will handle any landscaping material. Ask what observations suggest a simple maintenance correction versus a problem that warrants an in-person tree-health assessment. Do not assume the tree is already decaying or promise that pulling mulch away reverses previous stress. A professional should consider species, drainage, grade changes and visible symptoms before recommending excavation or additional treatment.